When using Excel today, I hit a roadblock and found a solution that I want to share. Here’s some back story to give it context:
The Back Story:
Our General Manager, Darren, asked me to track down the Excel workbook we used last year to determine which clients receive Christmas Cards and then create a mail merge to print labels with their addresses to use on the card envelopes. The idea was we could reuse the 2015 list for our 2016 mail-out, after adding the 30+ new clients we started working with this year. The original worksheet was created using a simple Export to Excel from a SharePoint list with three columns visible:
- Client Name
- Key Contact Name
- Client Address (ok, this was more like 6 columns, but I want this blog to be #KISS)
After exporting the information, I saved the file to our Marketing SharePoint library and added a column in the Excel worksheet for “Receive Card?” with three choices: “Yes, No, To Be Determined.”
When I realized the amount of work that would need to be done to update and validate the data to make sure it was clean, free of duplicates, and not missing anyone, this was my immediate reaction:

(Aren’t I a gem?) To be clear, this reaction was NOT directed at Darren’s request, but at myself for not working smart, and being inefficient. I had produced a quick result, that made more work for my future self. Boo!
I struggle to recall why I decided to store data in a separate Excel spreadsheet. If I had added the column in the SharePoint list, I’d be able to export a fresh list with two mouse clicks. Alas, I had not, and now I faced merging data. Even with some of the tools available in Excel to assist with this task, at the end of the day I don’t trust robots to do a human’s job. And, if a new client did not receive a card because of a data entry error, I’d feel like Ebenezer Scrooge.
My immediate thought was: “If we had ONE list to rule them all, that tracked ALL the information in one spot, I’d only have to keep one location up to date.”
(At that point in time, we had a workbook to track Christmas Cards, another workbook to track Event invitations, a OneNote table to track invitees to our Office 365 Lunch and Learns, another table to track New Client Suite Night invites, etc. Which is not a huge deal, until you start adding up the time to update all of these when a new client started working with us, and time others spend searching for where I stored these lists.)
I knew four things:
- Now was not the time to reinvent the wheel or build something new in SharePoint. (If you want to know why, take a gander at this: “Why I’m Using an Excel 2016 Spreadsheet to Manage Data“).
- I could not wait for the new system. I needed to have access to an active, accurate record of this information, in the meantime.
- At the end of the day, the Dev Team would be happiest with a file containing clean data that could be imported into our system of choice when that decision was made by Leadership Team.
- Part of the decision-making process would involve my input on what type of data I needed to do my job.
That’s why I created a Master Client List in Excel (stored in a SharePoint library) that keeps track of all Client information that is not related to Billing or Time Entries. The best part is, Darren or I can go in the Master file to update the information, then create a copy as a separate file to slice and dice the data to get what we need to do a mail merge, then toss that copy when we’re done without the need to store duplicates.
The Front Story:
I now have ONE spreadsheet with 30 columns and 309 rows (which is growing daily as I continue to add more data) that manages a list of active and inactive clients. (For those of you thinking “That’s not a very big list,” the list is incomplete – it only contains data from the date we started using that specific SharePoint list).
One of the first things I did to the spreadsheet was to convert it to a table so I could sort and filter the columns by variables. I quickly learned how moving column order was a pain, and how adding new rows or columns in the middle of the table ruined the formatting. I wanted to remove the table formatting without ruining my data…The main issue was this: I didn’t know what a “range” or a “normal range of cells” meant so I completely overlooked the “Convert to Range” button.
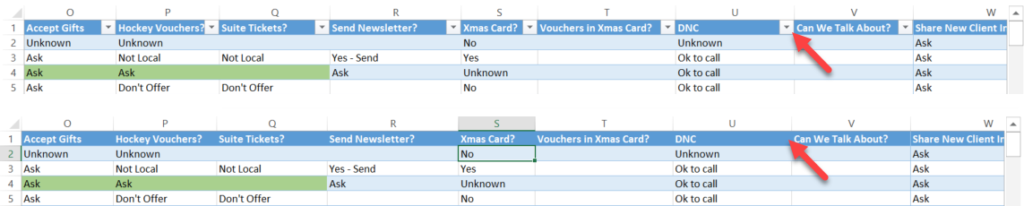
If you aren’t familiar with what table looks like in Excel, here’s a visual:

The top image is a Table. You can tell because Row 1 is a header with dropdown menu buttons that allow you to sort and filter the data. Another way to tell is if you scroll down your worksheet – the Table headers will always be visible. The bottom image is a “normal range of cells”. You can tell because Row 1 is not a header and does not have dropdown menu buttons. As there are no headers, the headers do not follow you as you scroll down.
So began my journey to figure out how to remove table formatting in Excel 2016… which involved a lot of clicking around and Google searching. I found the answer on the Mr. Excel.com Forum.
- Use your cursor to select one cell within the table to make the Table Tools Tab will appear above the Design Tab.
- The Design Tab is only visible when a portion of your Worksheet has been formatted as a table.
- Until you select a cell in the table, 75% of the buttons in the Design tab will stay grayed out.
- The keyboard shortcut for Select all (Ctrl + A) works as well – because pressing Ctrl + A once only selects the current region first, and you have to press Ctrl + A a second time selects the entire worksheet.
- That is why using the “Select All” button does not work, as it automatically selects all the cells in a worksheet.
- Select the Design tab.
- In the Design tab, click on Convert to Range.
- Press Yes on the “Do you want to convert the table to a normal range?” pop up appears.

Your table has now been converted to a “normal” range of cells.
You can then use the Select All button followed by font formatting buttons to set the Fill Colour to No Colour.

Hope that is helpful to some of you out there. Keep calm and Excel on!
excellent post, smooth and clear steps. cheers
This article shows how to convert an Excel “Table” Object back into a collection of rows and columns in Excel worksheet. Yes, that technique removes the colored row formatting, but it obliterates the Table object and its identity is lost.
This article does NOT show how to remove formatting from an Excel “Table” Object.
I need to preserve the Table object and remove its colored formatting. If you convert your result back into a Table object, then it adds back the striped row formatting.
I needed to know how to remove formatting ONLY, and not destroy the Excel Table object.
It would help if you retitled your article to An accurate title would be “Convert Excel Table Objects back into a Normal Range of Cells” in order to be more precise, so that others don’t find your article by mistake.
Thank you.
That is very good feedback Rich!
I’ll do one better – I will keep the title of the article as is and add instructions for how to remove formatting ONLY, and not destroy the Excel Table object.
Stay tuned.
when will the “I’ll do one better” be added?
Hi ! Thanks for sharing this trick !
I discovered rather recently this “Table” formatting feature in Excel, through my OneNote experiments (the feature is requested to limit the range of an excel sheet displayed within OneNote…), and also through Power BI…but it drove me nuts when I realised I couldn’t remove this formatting !!!
Thank you very Much, this feature really helped.
I was struggling long to get rid of that feature, after doing it, I lost nothing in the process, my database just as original without the Format Feature.
Happy about that.
Thanks for posting this. It’s a baffling “feature” to be unable to insert rows in a table. I’ll never format anything as a table again. What’s the upside of tables in Excel?
Thanks Kelly,
Love it!
Am I missing your real question, isn’t this just a matter of Design tab > Table Styles section > None?
Thank you so much for saving my sanity ! How to remove the predefined ranges in a spreadsheet that had been exported from a SharePoint list was driving me insane !
Thank you for posting this, very helpful 🙂
It is a useful tip for anyone navigating excel
Many thanks. Very useful.
Very useful. Drove me mad if I wanted to reference another cell and saw in the resultsing formula containing @[Col1], etc… this drove me insane. Thanks to you this problem has gone away now!!