Single sign on (SSO) is an authentication method that lets you use a single username and password to access multiple applications. Seamless SSO occurs when a user is automatically signed into their connected applications when they’re on corporate desktops connected to the corporate network.
The benefits of seamless SSO are many. Not only does seamless SSO limit the number of times your end users need to enter their login credentials, it also helps improve your overall security posture by implementing authentication systems beyond a username and password.
The best use case for seamless SSO is a hybrid environment, where your team is working on applications both in the cloud and on-premises. To establish a trust between the on-premises and cloud environments, you’ll need to use Azure AD Connect.
In this blog, we’ll walk through how to implement SSO in Microsoft 365.
Before You Start
Before you implement SSO in Microsoft 365, ensure your system meets the prerequisites. We recommend reviewing Microsoft’s documentation, but here’s a brief overview of what you’ll need:
- An Azure AD tenant, with the domain you plan to use added and verified
- On-premises Active Directory (schema version and forest functional level must be Windows Server 2003 or later, and domain controller must be writeable)
- PowerShell execution policy must allow running scripts (recommended policy is “RemoteSigned”)
- Azure AD Connect must be installed on a domain-joined Windows Server 2016 or later (can’t be installed on Small Business Server, Windows Server Essentials before 2019, or Windows Server core)
Configuring Azure AD Connect
When you have everything on the prerequisites list checked off, its time to spin up Azure AD Connect installation wizard. Select the customize option instead of express settings. Click through the user sign-in step – this step will give you the option to enable SSO, but only if you choose Password Synchronization or pass-through authentication as the sign on method. Choose one of these methods, as the use cases for the other options are relatively specific (for instance, if you’re a large organization with many domain controllers and a requirement for your own federation, you should select Federation with AD FS as a sign on method). Don’t forget to ‘Enable SSO’ before you leave this step!
Next, you’ll connect Azure AD Connect to Azure AD:
- Log in with your global or hybrid identity admin credentials
- Connect your on-premises directories or forests
- Configure Azure AD sign-in (typically use “userPrincipalName”)
Now you need to decide what you want to sync by way of domains and OUs. Its doubtful you’d want to sync everything from on-premises into the cloud, and it can get messy fast if you select items to sync that it turns out later you don’t need.
- Select ‘Sync selected domains and OUs’ and check off what you need to sync.
- Identifying users, filtering, and optional features can be left for now.
Enabling SSO
Now you’ll need to enable SSO. You’ll need your domain administrator credentials to configure your on-premises forest for use with SSO.
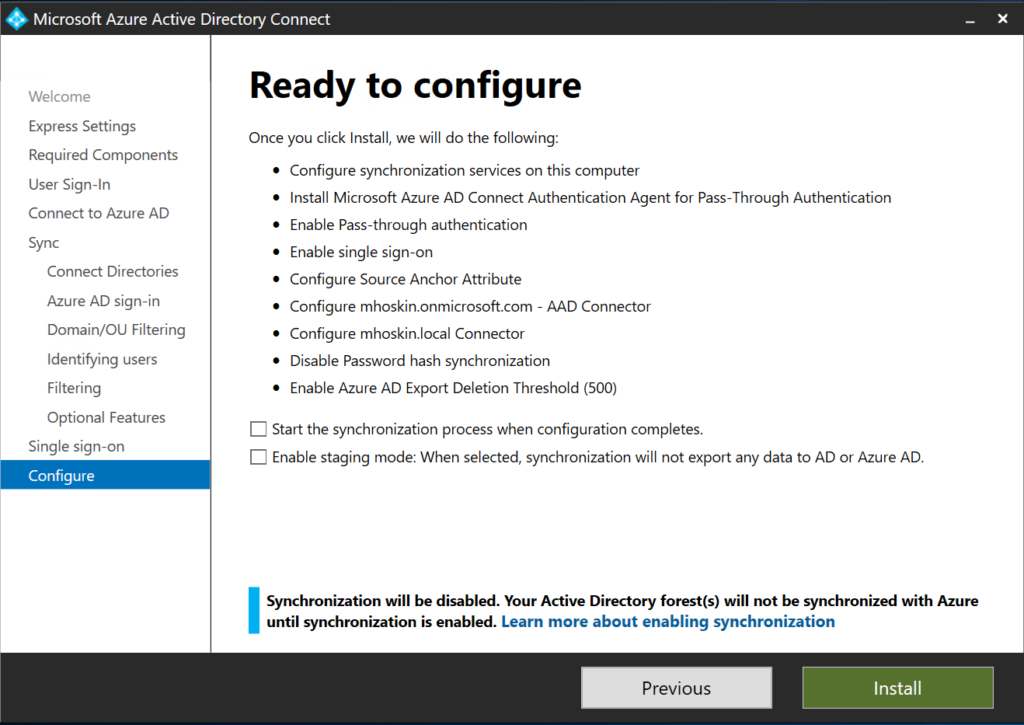
If everything looks good to this point, click “Install”. Note that synchronization has not been enabled here; there’s additional configuration to complete before adding users.


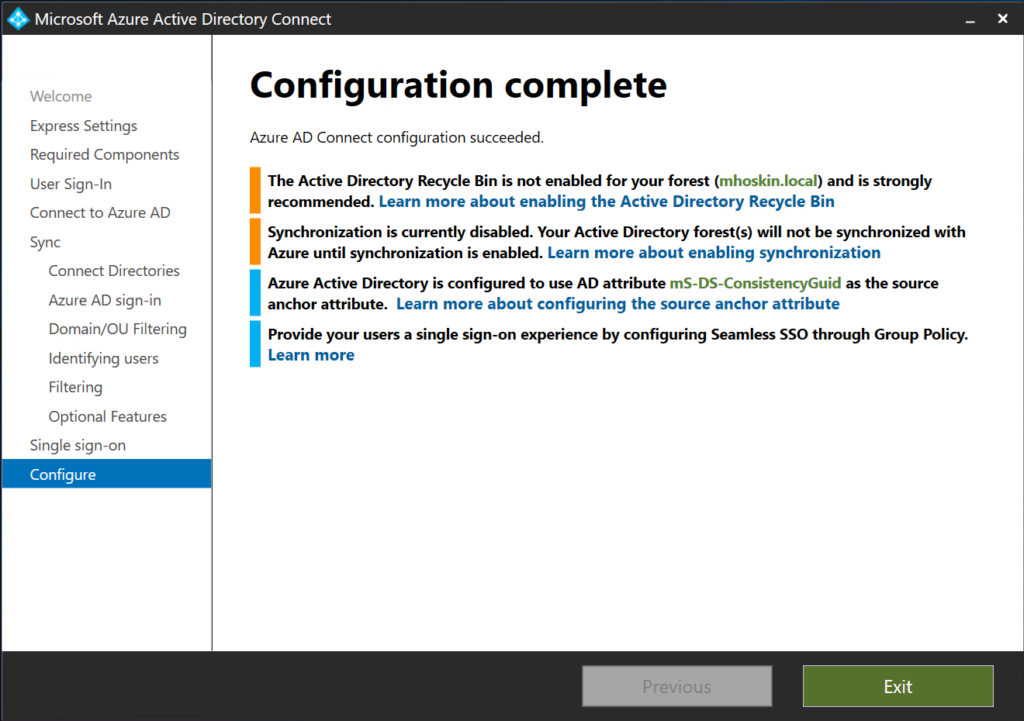
When you receive the “Configuration is complete” message, Azure AD Connect is installed and configured! Take a look within Azure AD:

Editing Your Group Policy
Next, log into the server manager and open the Group Policy Management editor. You’ll need to edit the group policy that’s applied to some or all of your users, which handles where users are sent (Intranet or Internet) when they navigate to URLs from the browsers.
You can find more information about editing your group policy here, but we’ll outline the steps below:
- Go to “User Configuration”, then “Policies”, then “Administrative Templates”, “Windows Components”, “Internet Explorer”, “Internal Control Panel”, and finally “Security Page”
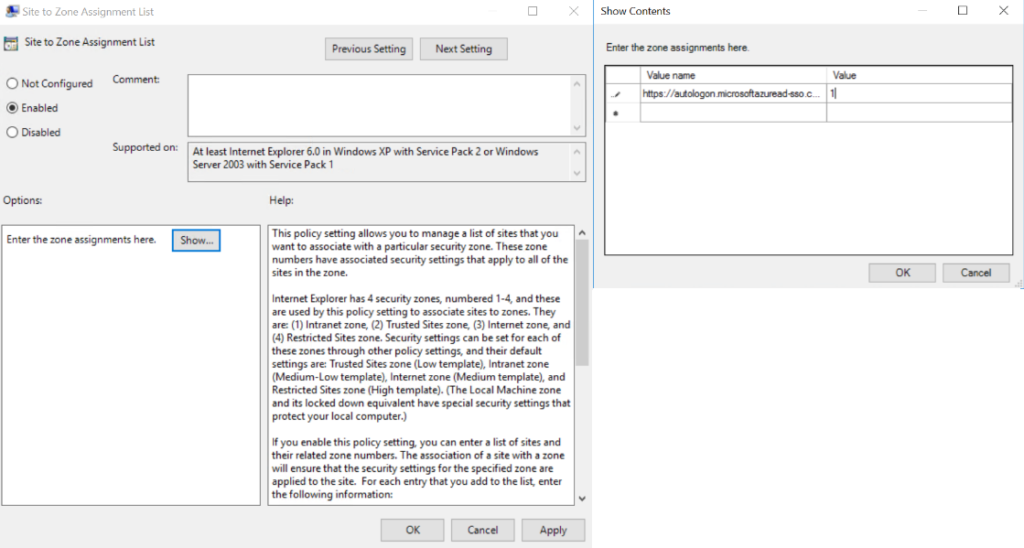
- Select site to “Zone Assignment List” and enable the policy
- Enter the following values:
- Value name: https://autologon.microsoftazuread-sso.com
- Value (data): 1
- Click “OK”, then “OK” again
- Go to “User Configuration”, then “Policies”, “Administrative Templates”, “Windows Components”, “Internet Explorer”, “Internet Control Panel”, “Security Pages”, then “Intranet Zone”
- Select “Allow updates to status bar via script”
- Enable the policy setting
- Click “OK”

- Go to “User Configuration”, then “Preferences”, “Windows Settings”, “New”, then “Registry item”
- Enter the following information:
- Key Path: Key Path: Software\Microsoft\Windows\CurrentVersion\Internet\Settings\ZoneMap\Domains\microsoftazuread-sso.com\autologon
- Value name: https
- Value type: REG_DWORD
- Value data: 00000001
- Click “OK”

Enabling Sync
Lastly, you’ll need to enable sync by following these steps:
- Open PowerShell
- Enter “Get-adsyncscheduler”
- This should provide text which includes “Syncenabled = false”
- Set “adsyncshceduler -syncenabled $true”
- Enter “Get-adsyncscheduler”
- You should now see “Syncenabled = true”

Testing the Solution
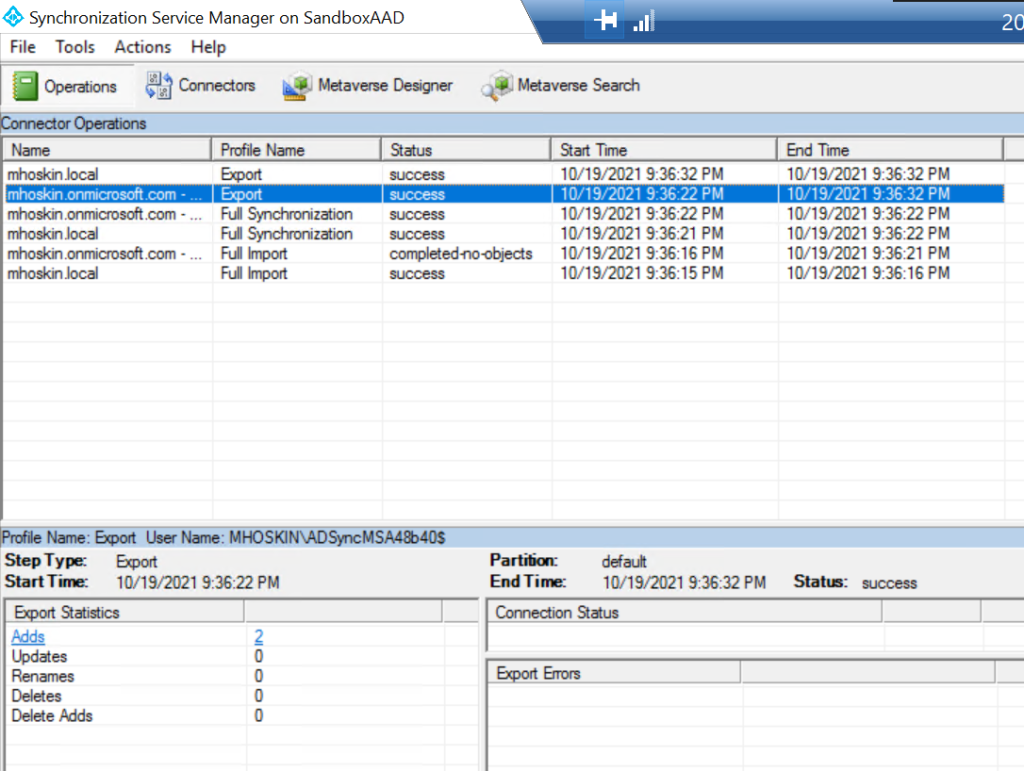
To check if all your hard work has paid off, go to the sync service manager. Under “Connection Operations”, select your Azure AD name. Under “Statistics”, the number of adds should equal the number of objects synced from Active Directory to Azure AD via Azure AD Connect.

If that didn’t work, try “start-adsynccycle -policytype initial” in PowerShell.
Conclusion
SSO, and seamless SSO in Microsoft 365, have the ability to improve your end user experience, productivity, and security at your organization. We strongly recommend implementing SSO for your business.
Need assistance getting started? We can help! Get in touch with us at regroove.ca.